
A replacement belt matches the old width, yet small cartons tip at the handover. The belt may carry them steadily on the straight run. At the discharge, the gap, the change in level and the way the finished joint passes the nose all matter.
Assess conveyor belt transfer points using the actual product footprint, last and first points of support, and installed belt path. Record the gap, elevation, speeds and guide clearances. Then confirm that the offered belt, underside, reinforcement and finished joint can run over the installed pulleys or nosebar before approving a representative product trial.

What Is a Conveyor Belt Transfer Point?
A transfer point is the area where a product leaves one conveying surface and moves onto another conveyor, a machine infeed or intervening hardware. This guide covers unit-handling transfers for discrete goods such as cartons, packages and industrial parts. Bulk-material transfer points have separate design requirements for chutes, impact loading and dust containment. The product can lose support at the discharge before the receiving belt takes its weight. Belt selection therefore starts with both the product path and the belt path. The conveyor’s supports, guides and drive parts remain part of the installed equipment specification. Conveyor components and belt selection
Which Transfer Arrangement Is Installed?
An inline transfer passes a product forward between surfaces. The belt can turn around a small rotating pulley or slide over a fixed nosebar at either end. A side or perpendicular transfer changes the direction of travel, and the product may cross a belt edge. Sketch the actual path and label which belt or hardware supports the product at each stage.
A transfer plate provides stationary support between surfaces. A powered transfer module uses a driven surface to move the product across part of the handover. A modular belt is a different construction with linked modules and its own drive engagement, and may be used in an engineered transfer. Identify the component that needs replacing before requesting a quotation. Dorner’s transfer overview illustrates how these equipment choices depend on the product and line layout. Dorner’s five conveyor transfer methods
How Should Transfer Gaps and Product Dimensions Be Checked?
Measure where the product loses support and where it gains support again. The gap between frames can differ from the effective unsupported distance because a belt curves away at a pulley, a guard sits above the transfer, or a plate bridges only part of the span. On a marked-up drawing, show the outgoing and receiving belt surfaces, any plate edges, and the approach direction. Record each unsupported interval along that direction and the signed height difference between the working surfaces. If a lift or pivot moves the transfer, have the equipment team check the permitted operating positions and clearances.
Give the supplier the smallest effective footprint in the actual orientation, along with width, height, mass range and base details such as recessed panels, feet or loose film. A carton can have a long outer dimension but a short area that bears on the belt. A high or offset centre of gravity may make it sensitive to tipping when support shifts. Include fragile corners, flexible packs and products that can enter skewed. Document the belt speeds and the expected handover during steady running, starts and stops.
A smaller gap can help a short item bridge the transfer. A raised receiving surface can still catch a leading edge, and a speed difference can pull or turn an item while it spans both belts. Specify the product behavior that counts as acceptance, including permitted orientation, marks and damage. Logistics conveyor transfer and sample review
When Is a Nosebar or Small End Pulley Appropriate?
A fixed nosebar has a stationary curved surface over which the belt slides. The underside, support material, radius, wrap and operating tension influence sliding resistance and heat. A suitable construction needs sufficient longitudinal flexibility and a supplier-approved underside and splice for the fixed contact. A nominal pulley diameter from a catalogue does little to describe that sliding duty. Habasit’s engineering guide treats fixed nosebars and noserollers separately and describes frictional heating at the fixed nose. Its construction and joining instructions apply to the belts it documents. Habasit Fabric Conveyor Belts Engineering Guide

A small rotating end pulley turns with the belt. Request the actual diameter and show the shaft and bearing arrangement where they limit the transfer layout. The tight bend still matters, as do the available clearances and the joint’s local flexibility. Record the return path as well. A backside idler can impose a reverse bend even when the discharge pulley has enough diameter for the belt body. Ask for the approved path for the complete loop, including both bend directions, guides and joint. Where reducing end size would require hardware changes, have the responsible engineering team review the design.
How Do Belt Surface, Support and Joint Affect the Handover?
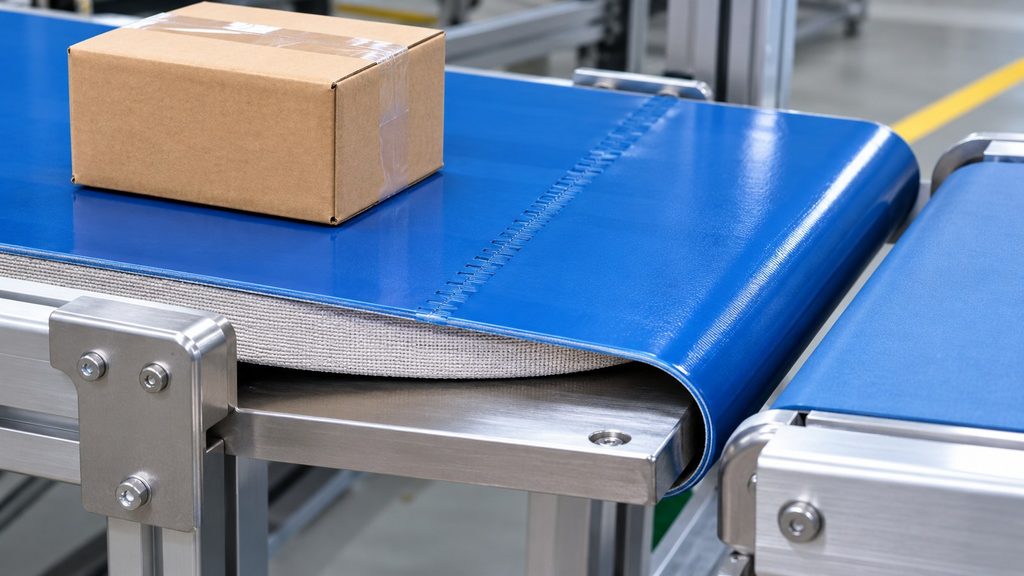
LKBELT’s blue PVC flat conveyor belt is shown with a glossy blue carrying face and fabric underside. These are two different interfaces to specify. Use the actual carton base to evaluate grip and scuffing on top, and identify the support material the fabric runs against below. Confirm the offered grade, dimensions and joint against the conveyor layout. Appearance alone gives too little information to approve friction or fixed-nosebar duty.
LKBELT’s transparent PU conveyor belt is pictured as translucent roll material. Its separate PU range table lists R-1M0980-FDA at 0.8 mm thick with a published minimum pulley diameter of 16 mm, and R-2M1712-FDA at 1.3 mm with a published minimum pulley diameter of 20 mm. Each pair of figures belongs to its own model row. The photograph shows the roll separately from those model references. Ask for the exact belt offered and confirmation that its finished joint, guides and operating duty suit the actual bend path. A rotating-pulley check and approval for a stationary nose are separate requirements.
The PVC sawtooth conveyor belt illustrates a different carrying surface. Its raised pattern has a height, spacing and direction that belong on the order. At a transfer, check how the actual product rests on the pattern, releases at the discharge and clears guides or plates. Include total finished thickness and the way the pattern meets the joint. Assess the build for the actual load and travel direction.
Check the joint profile and flexibility on both faces. A finger or other supplier-approved splice can change local thickness or stiffness. Show splice orientation where relevant, as well as openings near plates, scrapers and supports. Verify clearance and repeated bending, and watch what happens when the splice passes under a product. Check underside guides through their grooves and around the return. Conveyor belt splice types
What Changes for 90-Degree and Side Transfers?
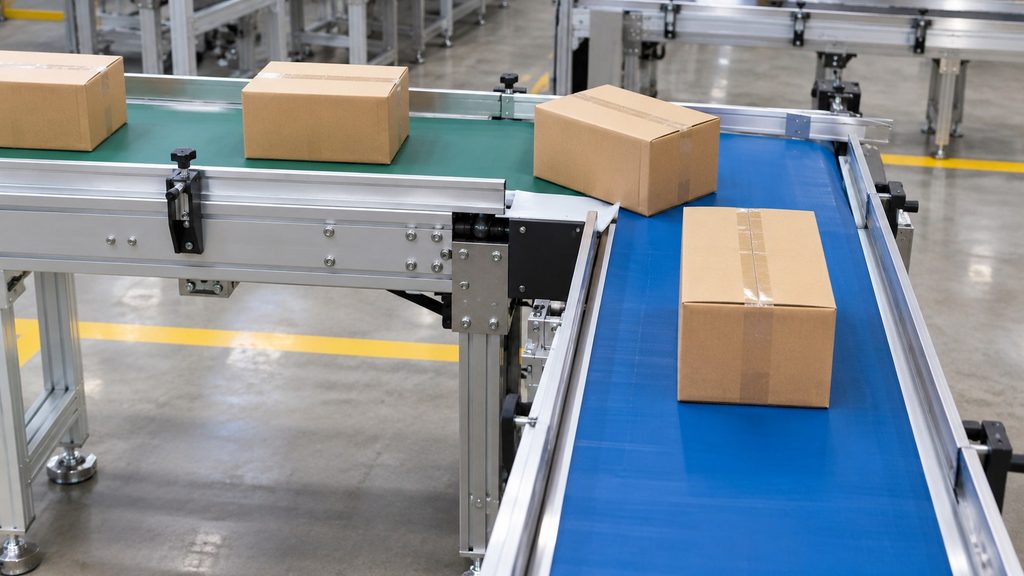
Mark the entry and desired exit orientations, and identify the edge that must lead into the next machine. At a perpendicular handover, the receiving belt can pull across the product base while the sending belt still supports part of it. Base friction, the location of the centre of gravity, speed relationship, elevation and guide contact can all affect rotation or tipping. Dorner describes speed relationships and bump-turn arrangements for specific layouts. Use the installed design and the product mix to set the expected orientation. Dorner’s 90-degree transfer examples
Observe where the package crosses the belt edge and where it first touches a guide. Check for rub marks, edge contact and belt movement during repeated side loading. A cover change can affect grip or release. Consistent rotation also depends on the equipment’s geometry, speed and guiding. If the trial shows an orientation problem, have the equipment team assess those factors alongside the belt.
When Are Transfer Plates or Powered Modules Needed?
Discuss an engineered plate or module with the OEM when the required support or controlled movement cannot be achieved with the installed transfer. A plate adds a support surface and introduces belt-to-hardware interfaces at both edges. Check how those clearances behave when the belt runs, the splice passes or the equipment changes position. Flexco’s parcel case illustrates how a plate clearance on a pivoting transfer affected both trapping and belt pinch risk. Its reported solution belongs to that installation. Leave hardware changes, guarding and jam-clearing procedures to the responsible equipment team. Flexco segmented transfer plate case
Conveyor Belt Transfer Point Selection Matrix
| Transfer arrangement | Product-handling risk | Belt compatibility | Required buyer verification |
|---|---|---|---|
| Inline end-to-end | Short or flexible product loses support | Carrying face, seam and receiving fit | Unsupported intervals, levels, speeds and product trial |
| Fixed nosebar | Product stalls or release changes at the nose | Sliding underside, flexible carcass and approved joint | Actual radius, wrap, support material and finished-loop approval |
| Small rotating end pulley | Leading edge catches or product tips | Permitted bend and joint clearance | Actual diameter, reverse bends, installed route and trial |
| 90-degree or side transfer | Rotation, tipping or guide contact | Cover, lateral tracking and edge condition | Footprint, speed relationship, levels and exit orientation |
| Transfer plate | Product traps or seam interferes | Belt-to-plate clearance on both sides | OEM geometry and clearance across permitted positions |
| Powered or modular transfer | Loss of support or inconsistent handover | Correct belt, module or drive interface | Equipment reference, engagement and operating sequence |
Two Practical Industrial Scenarios
Small cartons on an inline packaging transfer
Suppose a line handles short cartons, some with a recessed base. The cartons tip after a belt replacement. Map the actual support points and compare the smallest bearing footprint with the unsupported interval and receiving height. Confirm the end pulley, underside and splice against the approved drawing. Run a trial with the lightest and shortest relevant cartons, including start and stop conditions and repeated joint passages. Record whether tipping occurs at every handover or coincides with the seam. This helps distinguish transfer geometry from a local belt feature.
Parcels turning onto a perpendicular conveyor
Suppose cartons with taped and coated bases leave the same transfer at different angles. Record entry orientation, contact faces, both speeds, the elevation change and the point of guide contact. Watch for side movement of the belt and rub marks on the carton or guide. Compare candidate covers under the same approved machine settings. If the expected exit orientation varies across the package range, review speed and guide geometry with the equipment team before approving the cover change.
What Should Buyers Send With a Transfer-Belt RFQ?
Issue the same transfer drawing and operating conditions to each supplier.
- Machine and transfer. Conveyor model and belt position, layout revision, unsupported intervals and levels, support bed, end pulley or nosebar details, return path and take-up.
- Product and duty. Footprint, dimensions, mass range, base material, fragility, entry and exit orientation, both speeds, load, starts and stops, and exposure to dust, oil, moisture or cleaning.
- Finished belt. Part number, cover, underside, reinforcement, width, length basis, total thickness, seam, guides or profiles and installation access. Mark all hardware clearances.
- Order and acceptance. Quantity, delivery, required supplier confirmations and proposed deviations. Agree how to check the first belt against the drawing and which products and observations will govern the trial.
Verify identity, dimensions, joint and clearance before the authorised running trial. Observe tracking with and without representative side loads, joint passage, product scuffing or damage, and exit position during the intended cycle. Include small, light, heavy and fragile products as relevant. Keep the accepted drawing, conditions and results with the order record.
Frequently Asked Questions
Is there a universal maximum transfer gap?
Set it against the actual product footprint, stability, support and running conditions. Verify the result in a representative trial.
Can a belt rated for a small pulley run on a fixed nosebar?
Ask for explicit fixed-nosebar approval for the exact underside, splice and working conditions. Sliding at a fixed support introduces a separate requirement.
Why does the splice matter at a transfer?
It can change local thickness or flexibility and interact with a pulley, plate, guide or product. Check its full route and passage in the trial.
When should a transfer plate be considered?
Ask the equipment team to review a plate when the product needs additional support across the handover. The plate and its clearances require their own design review.
Will a different belt make every carton rotate correctly?
Check product footprint, friction, speeds, levels and guiding together. Confirm the required exit orientation with the actual cartons and machine.
Conclusion
Specify the support the product needs through the handover and trace the complete route the belt and splice must follow. Confirm the finished construction against the installed equipment, then use a representative trial to check product stability, clearance and tracking before repeat purchasing.